Christmas 2017 Target Dollar Spot

Target Dollar Spot Cocktail Napkins 2017.

2017 Christmas Target Dollar Spot

For those of you who know me, you know how much I love Target! I especially love their Dollar Spot and it is usually the first place I stop on my weekly, okay sometimes daily, trips to Target. If you caught my post earlier in the season on Target’s fall décor, you know that they once again hit it out of the park with their selections. Side note, I’m watching the World Series right now, so you might catch a couple of baseball references here and there. Also, the Astros are currently winning. Anyways, back to why we are all here, Target’s 2017 Christmas decor in their Dollar Spot! Y’all, it is lovely and oh so festive! Here are my favorite finds from Target’s 2017 Dollar Spot Christmas finds!

Target Dollar Spot 2017

Christmas Packaging and Wrapping

Christmas Wrapping Target Dollar Section

Where do I begin? I love planning out my packaging designs each year. The bags, the ribbon, the tags, it is just so fun! However, I really don’t like the amount of money I end up spending. Full disclosure, I have totally spent the same amount on the wrapping as I have on the gift inside of the wrapping. I know! It is so humiliating. But it happened and I have learned from my ways. Thankfully, I met Target’s Dollar Spot and that mistake has not been made again.

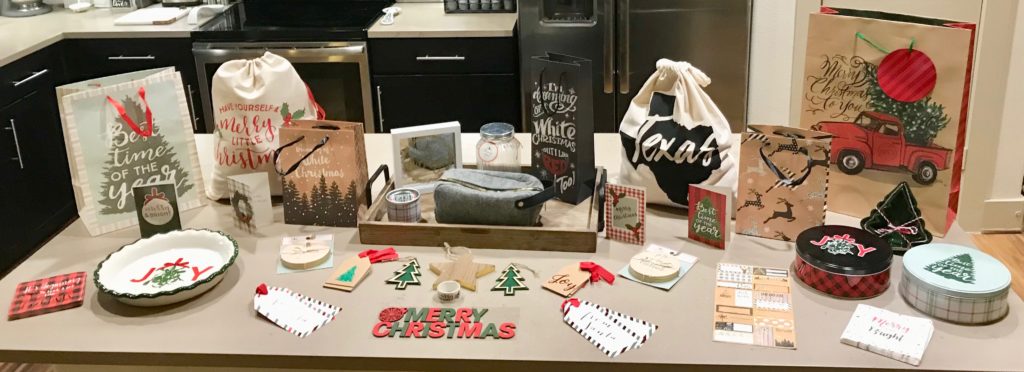
There are so many gift bags to choose from! Large gift backs, small gift backs, wine bags, and my very favorite this year, the adorable gift sacks! I don’t know about you, but I would flip a lid if someone gave me a gift in one of these adorable gift sacks. Hi, is this straight from Santa’s workshop? I also love the Texas design! For all of my non-Texas friends, I would love to see your state’s design! There are multiple gift bag designs in multiple sizes, so there are plenty to fit your style! Oh did I mention how inexpensive they are? Here is your holiday gift bag pricing guide from Target’s 2017 Christmas Dollar Spot:

Large Christmas Tree Truck Bag: $1

Wine Bag: $1

Draw String Gift Sacks $3 Each

Medium Best Time Of The Year Bag: $1

Black and White Small Bags: $1 for both! They are packaged in sets of two!

2017 Holiday FInds Target Dollar Spot

Target Dollar Spot Holiday Gift Tags

Target Dollar Spot Christmas Packaging

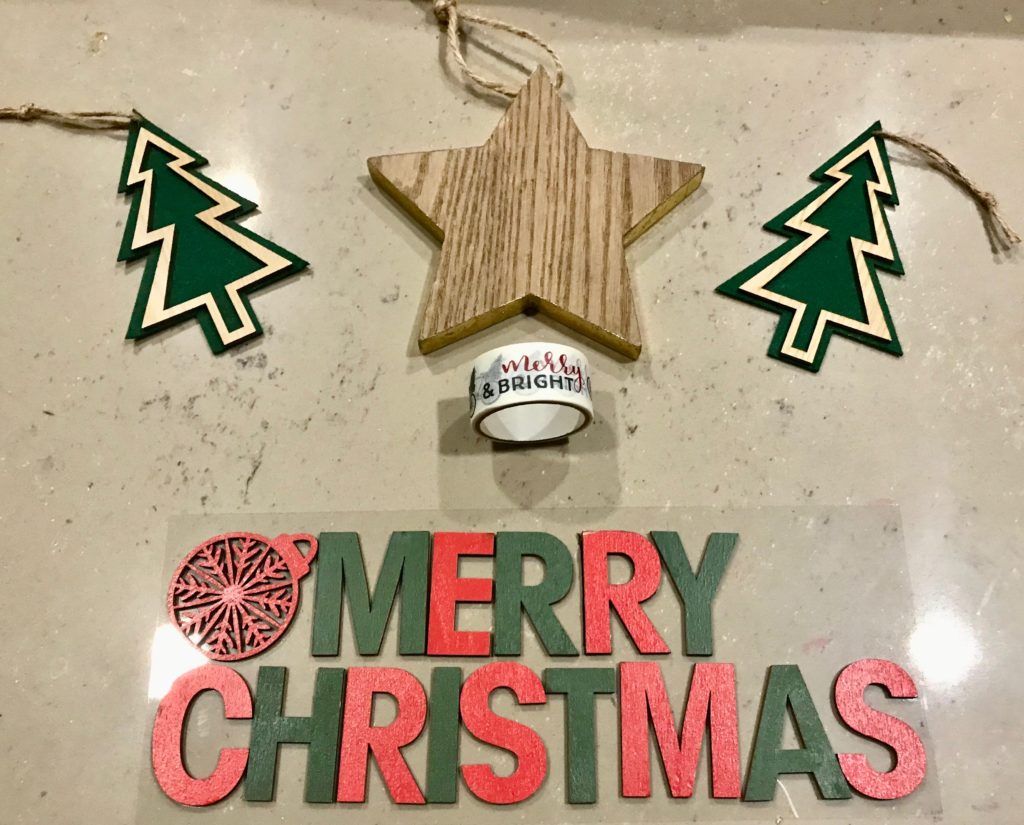
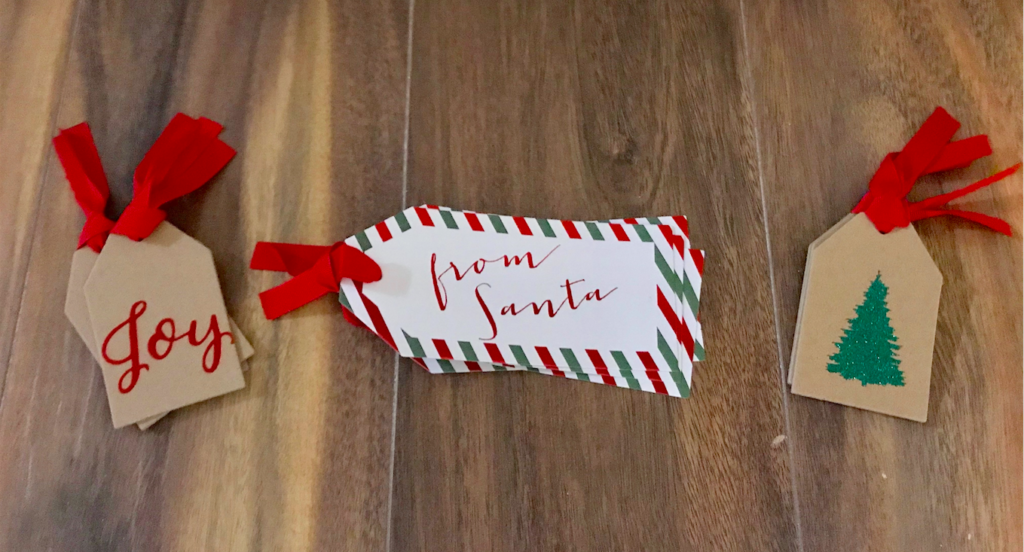
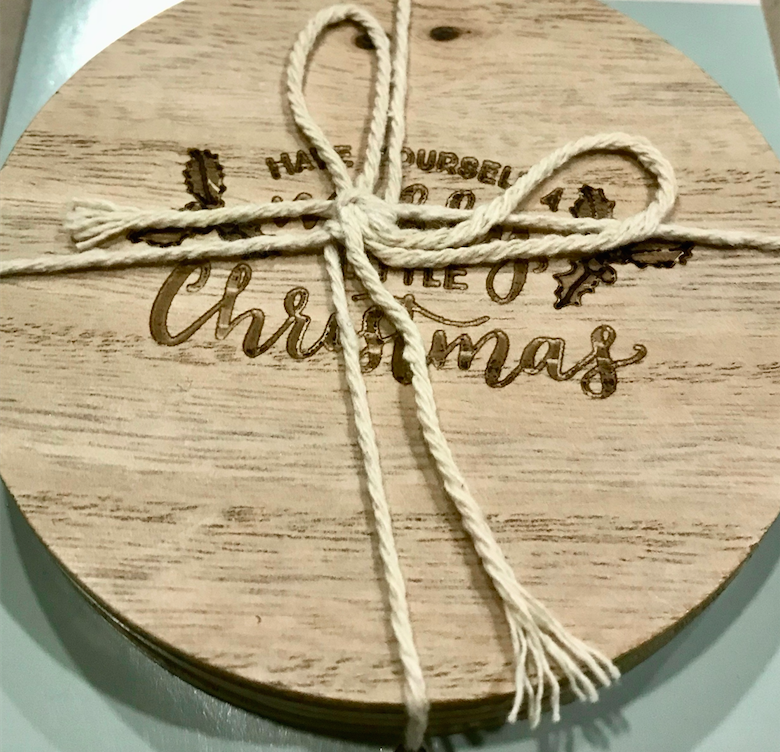
They also have so many adorable gift tags and wooden stickers to decorate your packages! I can’t wait to add these wooden Merry Christmas letters to one of my boxes! I’m also going to use a paint pen to monogram the star ornament! Here is the price breakdown for these adorable gift tags and gift tape:

Christmas Gift Tape: $1

Wooden Star Ornament: $1

Christmas Tree Gift Tags: $1 (Set of 2)

Joy Gift Tags: $1 (Set of 4)

Merry Christmas Gift Tags: $1 (Set of 3)

Merry Christmas Wooden Stickers: $3

From Santa Gift Tags: $1 (Set of 3)

Black and Gold Embellished Gift Tags: 1 (2 Sheets)

Christmas Decor

Christmas Home Decor Target Dollar Spot

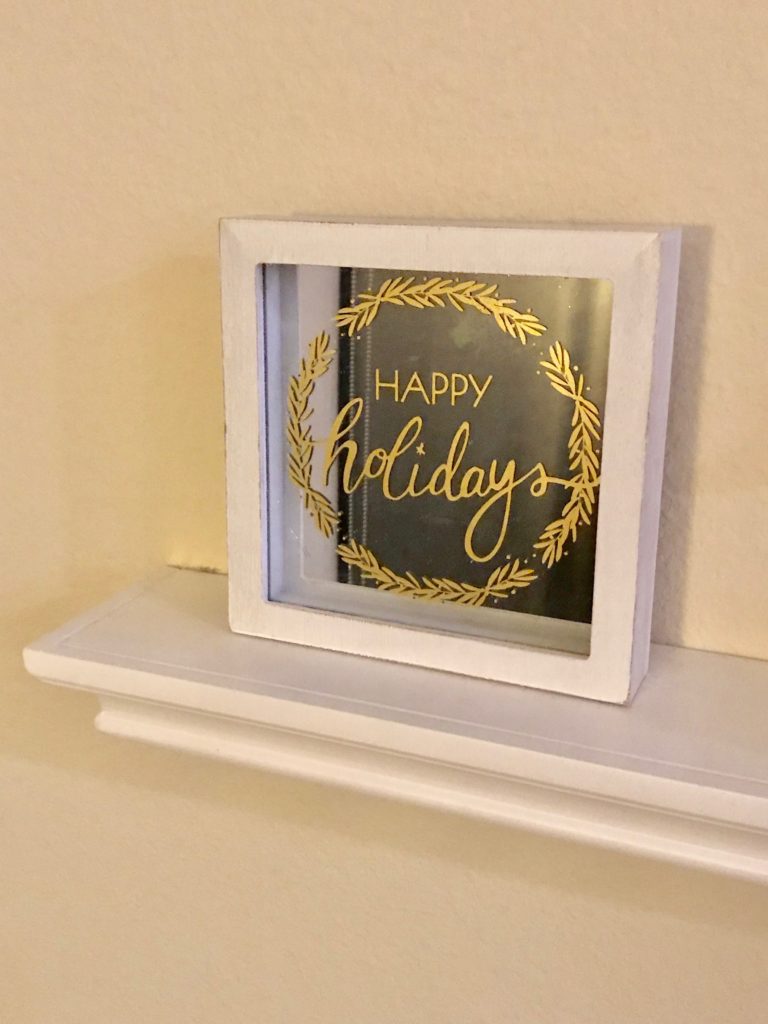
Decorating my home at Christmas time might be my favorite thing to do. This year’s dollar spot has so many beautiful décor pieces for your home including fur stockings and beautiful stocking holders! I had to rein it in for this portion because I already have so much home décor for Christmas. However, I had to purchase this adorable mirrored sign for one of my shelves. They have so many cute things like this and they have the cutest little Christmas trees for countertops and desks.

Décor Sign: $3

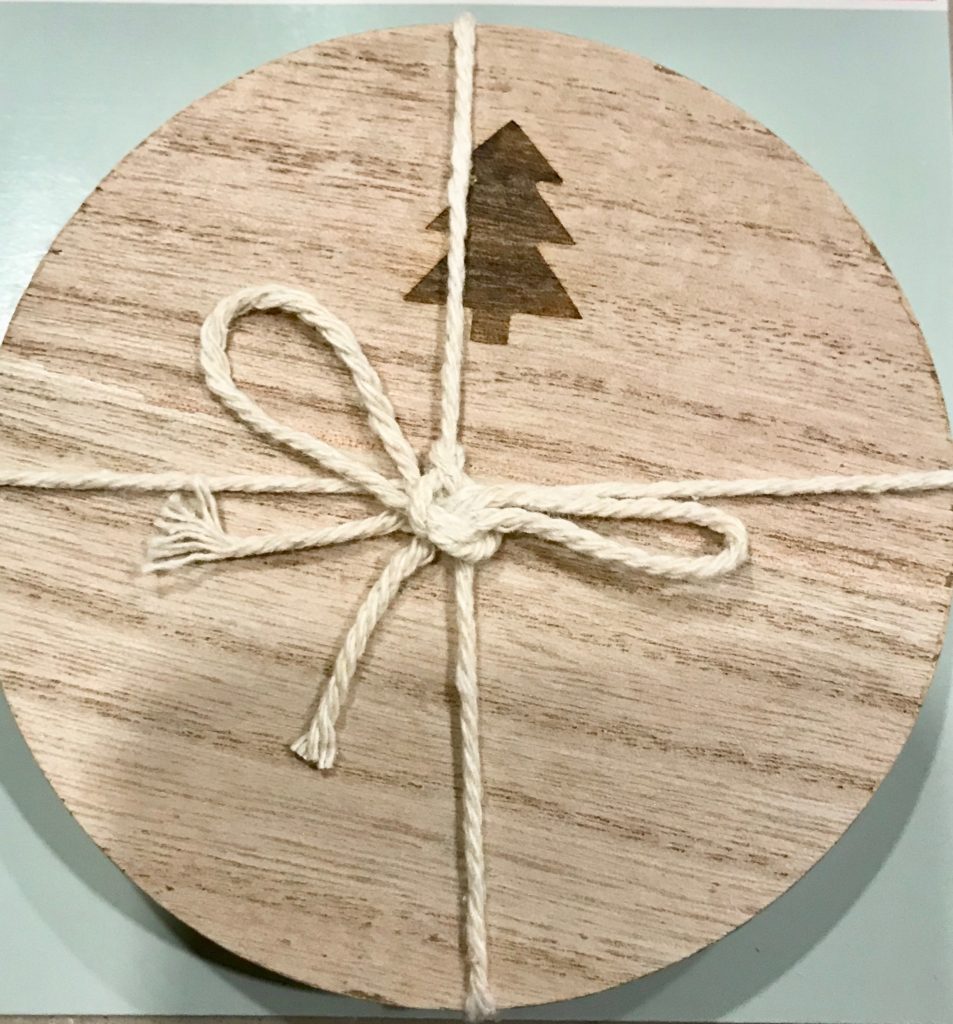
Cocktail Napkins and Coasters

Target Dollar Spot Cocktail Napkins 2017.

Cocktail napkins and coasters do two things at a party: Act as beautiful accent pieces for your décor theme for the evening and SAVE your beautiful tables, bars, and countertops from the unspeakable beverage ring. We have all been there. Nobody likes to discover the ring at the end of a successful evening. These cocktail napkins and wooden coasters are just too adorable! The wooden coasters will also act as a great accessory when gifting a bottle of wine or whiskey!

Christmas Tree Wooden Coasters

Black and Red Check Christmas Cocktail Napkins

Target Wooden Christmas Coasters

Christmas Cocktail Napkins Target Dollar Spot

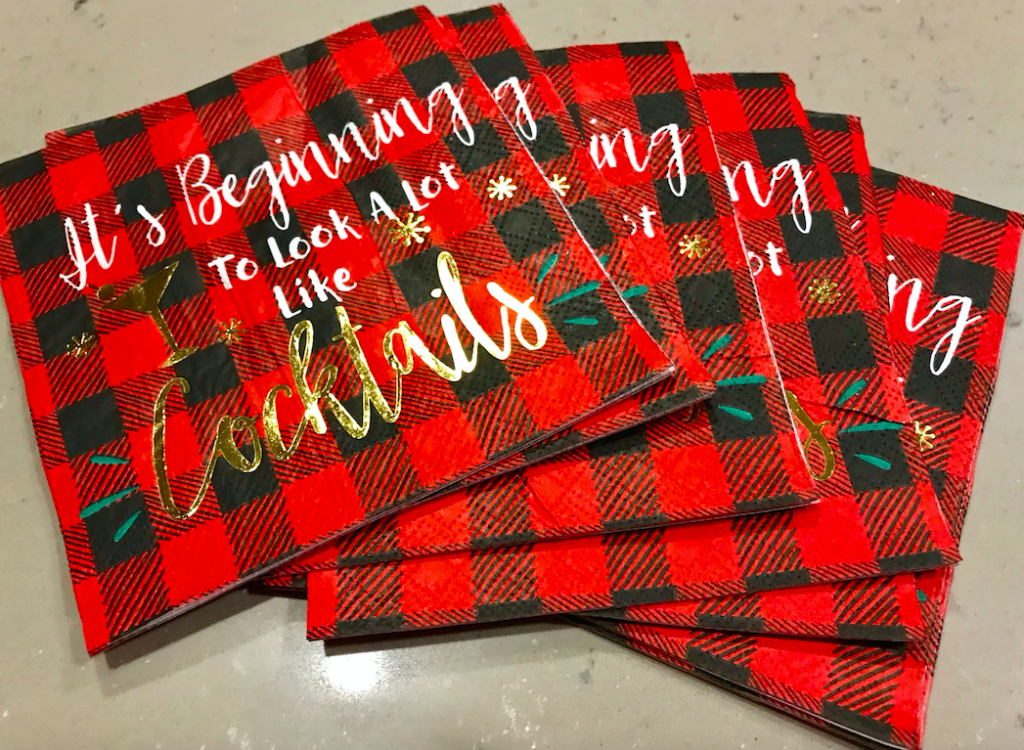
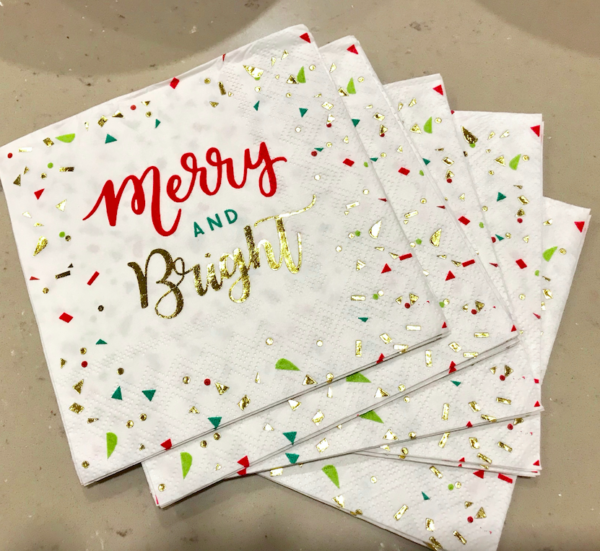
Cocktail Napkins: $1 Each (Set of 10)

Wooden Coasters: $3 Each (Set of 4)

Baking Pans, Baking Jars, and Baking Tins

Target Dollar Spot Holiday Baking Tins

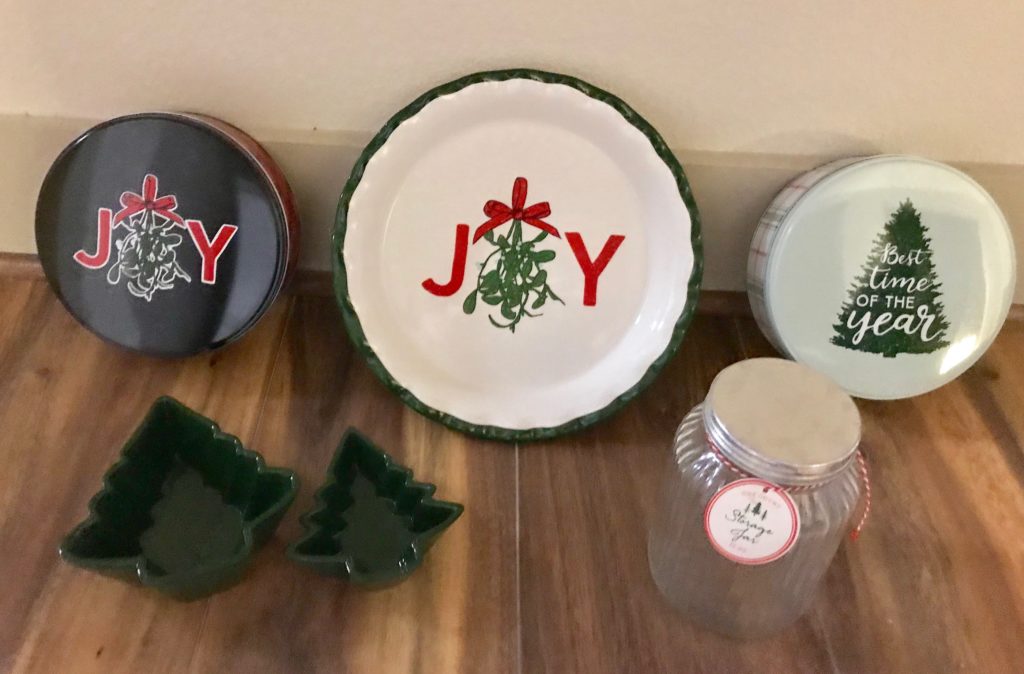
Every year I have a day of holiday baking! I make so many delicious holiday treats, package them in pretty tins and paper with ribbons and bows, and give them out to neighbors, co-workers, family, and friends. I love it! I watch Christmas movies all day and bake away! Part of the fun is making the packaging for these tasty treats absolutely adorable and full of Christmas spirit. However, this can get pretty pricey. That is why I was thrilled to find these adorable holiday tins in Target’s Dollar section! They have several designs to choose from and they are the perfect size for giving away holiday treats!

Target Dollar Spot 2017 Joy Pie Pan

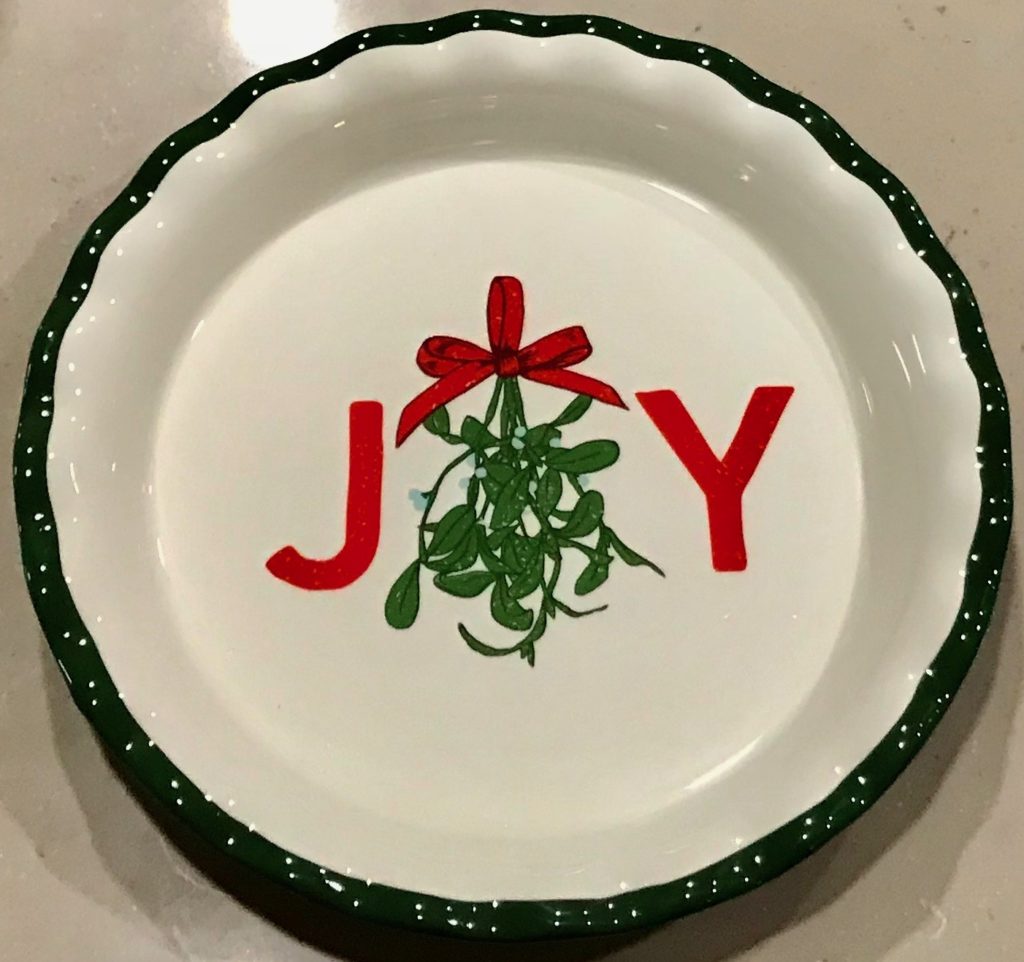
I am very excited about this Joy pie pan and Christmas tree ramekins. They will look fantastic on the table during the holidays! They also had a Merry Christmas pie pan and white snowflake ramekins! The giant jar is perfect for hosting your delicious and relaxing holiday gifts for friends! Whether you fill it with ingredients to make your perfect cookie recipe or fill it with your DIY Essential Oil bath salts, this is the perfect way to package your DIY Christmas gift! They also had a set of three mini glass jars as well!

Pie Pan: $5

Baking Tins: $3 Each

Christmas Tree Ramekins: $3 (Set of 2)

Glass Jar: $3

Holiday Cards and Gift Ideas

Target Dollar Spot Holiday Cards

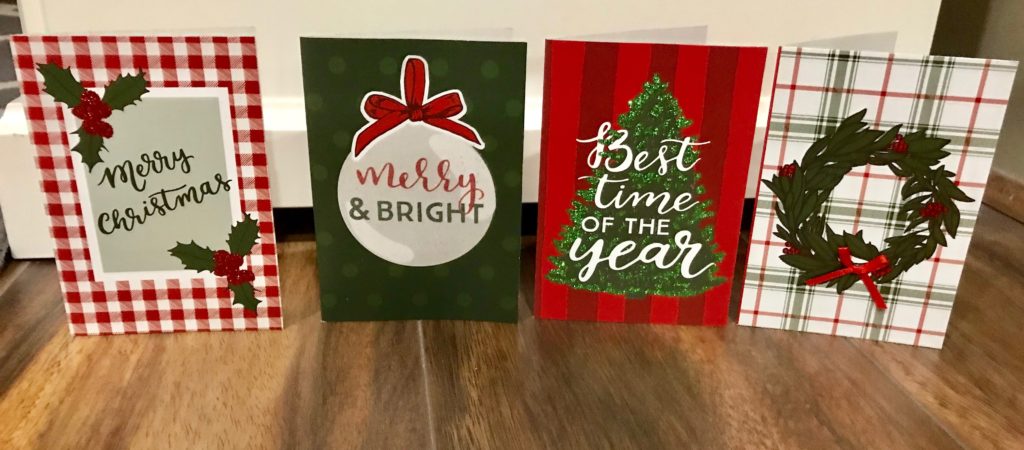
If you need a quick and inexpensive gift for someone, the Target Dollar Spot has you covered! They have so many adorable packs of holiday and Christmas cards to choose from. This pack of 16 cards and envelopes came with 4 different designs and 4 different messages. I love packs like this because there is a card that will work for everyone!

Gift Cards: $3 (Set of 16)

Cozy Candles

Target Dollar Spot Candle

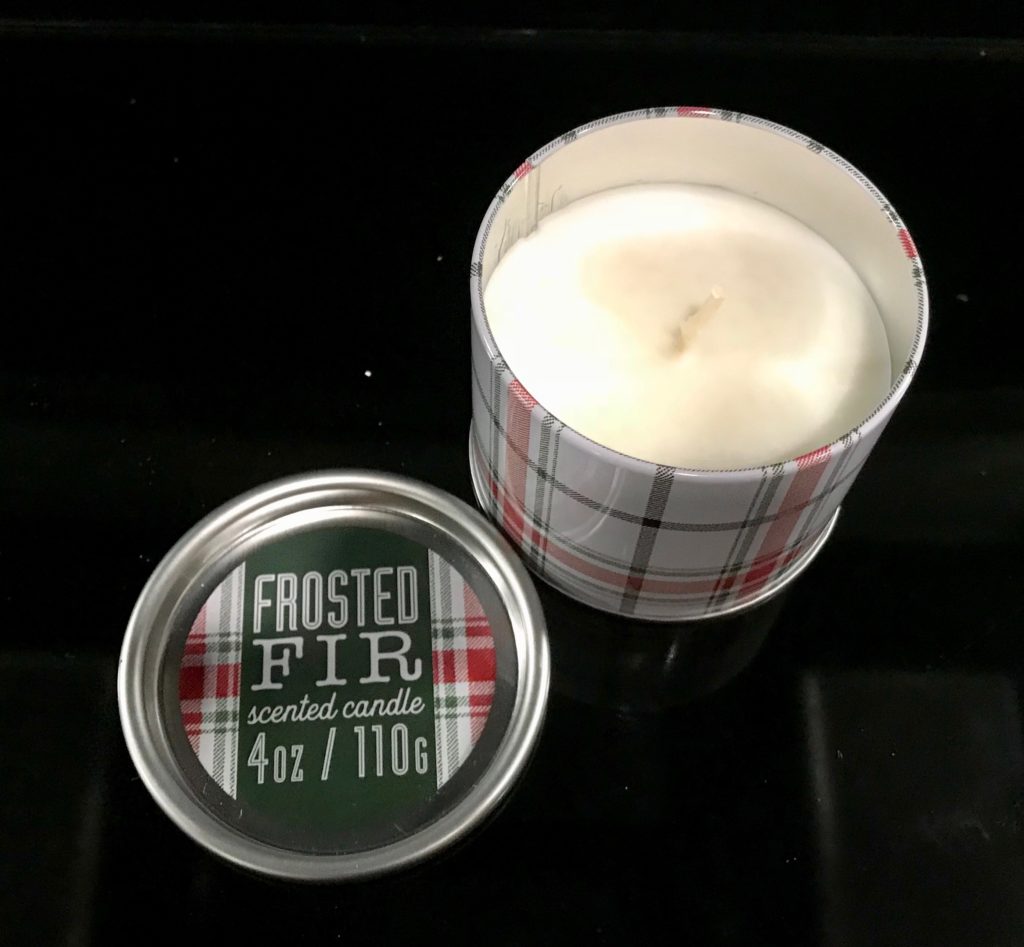
There are multiple candle scents to choose from! This one seriously smells like Christmas and it is wonderful! I also love the design. They have multiple scents in this size and they also have these super cute mug candles! These are perfect to go with a Starbucks gift card for your co-worker or as an extra stocking stuffer!
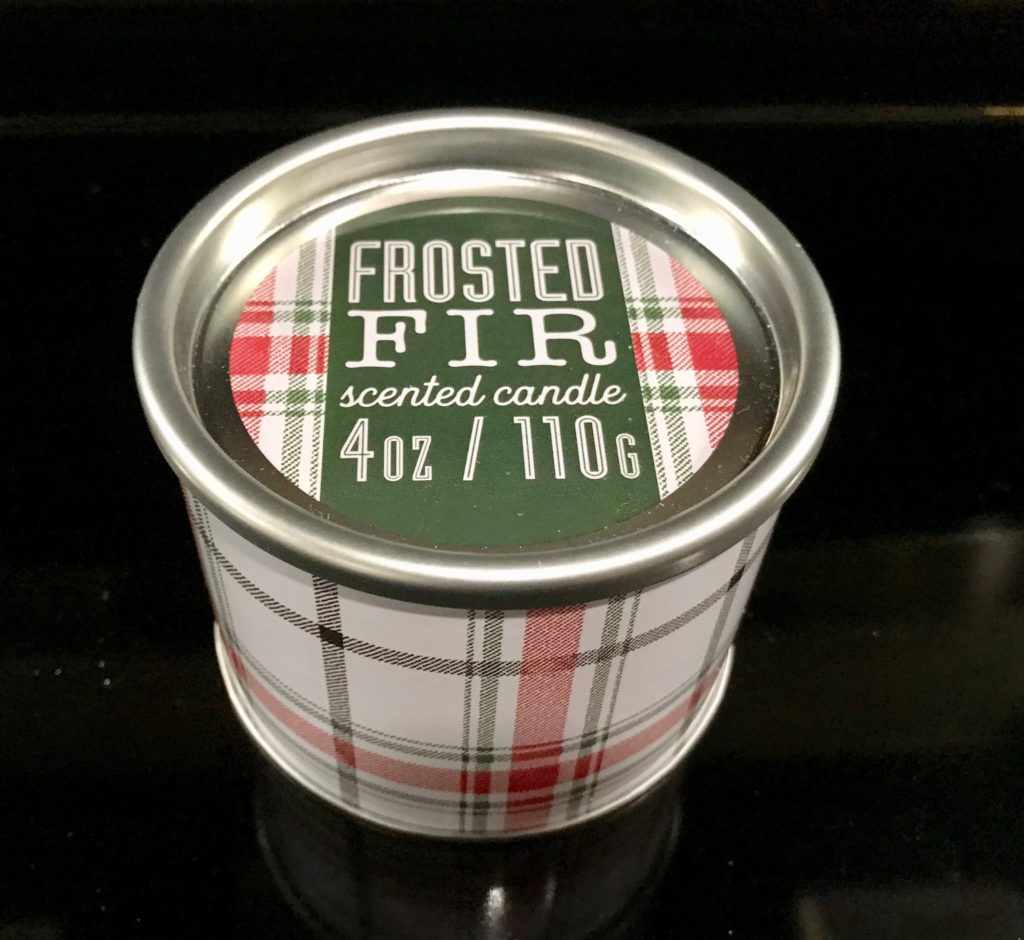
Target Holiday Candle 2017

Candles: $1

For The Men In Your Life

Target Dollar Spot Holiday Gift Guide 2017

There is even something for the men in your life! These super classy travel accessory bags are perfect for a stocking stuffer or to use as packaging for their gift! I love doing this! Instead of buy wrapping paper, put their gift in this adorable tote bag. It is two gifts in one! This will also make for a wonderful white elephant gift!

Accessory Zipper Bag: $3

For the Wine Lover

Target Holiday Gift Packaging

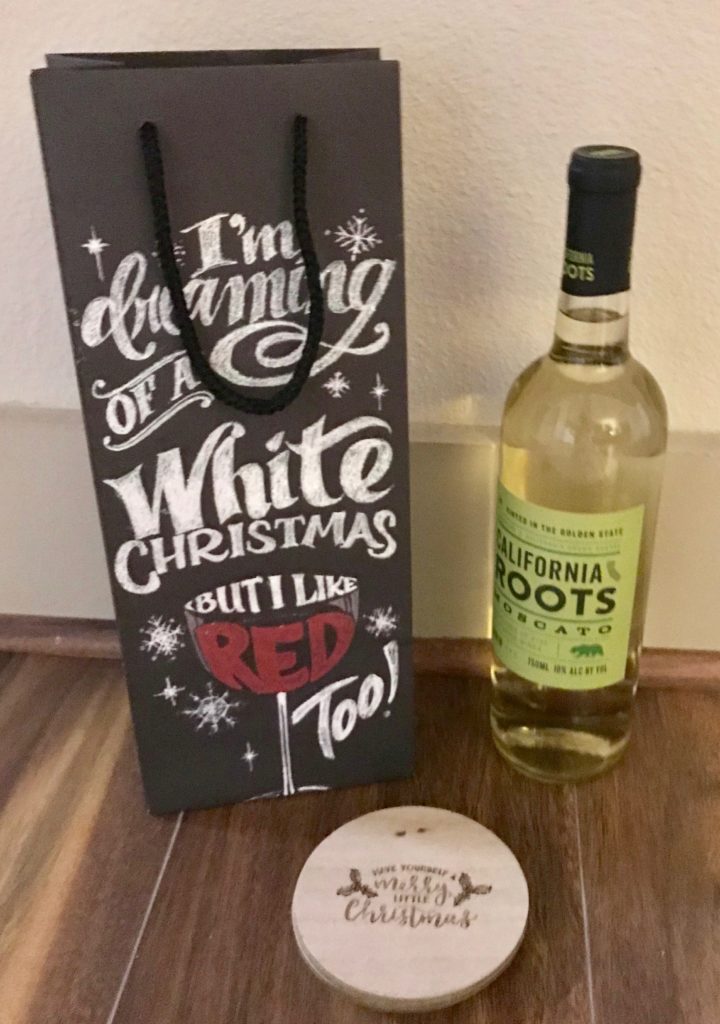
Pair one of the adorable wine bags with a bottle of Target’s new California Roots wine and a set of the wooden coasters and you have the perfect gift for the wine lover in your life for under $10! One stop shop and on a budget!

Wine: $5

Holiday Wine Gift Bag: $1

Coasters: $3

Have you already purchased your favorite finds from Target’s 2017 Christmas Dollar Spot? I would love to see what you found!

SaveSaveSaveSaveSaveSaveSaveSave

SaveSave

Continue Reading

Easy Chicken and Dumplings Recipe

Chicken and Dumplings Recipe

This post may contain affiliate links. Please read my disclosure policy for more information. 

We are finally starting to get colder weather in Texas and I am so happy! I absolutely love this time of year. Not only is it time to bring out those adorable sweaters and boots, but it is also the start to the holiday season and delicious recipes! There is just something about this time of year that makes me feel like a kid again! My mom would always make one of her cold-weather staples for the first cold night of the season. One of my absolute favorites was her healthier Chicken and Dumplings recipe. Now, before you click away because I said healthy, hear me out. It isn’t THAT healthy, just a little healthier than your normal Chicken and Dumplings.

This recipe is really so easy to make and makes delicious leftovers! This has become one of my favorite recipes to make all year because it is super easy for my husband to take for lunch the next day! When we are trying to cut out the carbs, we just don’t add the biscuits and cream of chicken soup and we have a delicious chicken and veggie soup! 

I did something a little bit different with this recipe this time. I recently purchased a Copper Chef 5-Piece Cookware Set and it is amazing! I also purchased a Copper Chef Induction Cooktop and I would highly recommend purchasing this as well. The Copper Chef is safe to use on all cooktops, but the Induction Cooktop really comes in handy when you are cooking a large meal and need extra burners or space. I’m especially excited about this for the holidays! If you are a food blogger and like to post recipe tutorials or step-by-step instructions, the induction cooktop makes it really easy to have a clean photo or video demonstration. I’ll be honest, I was a little bit skeptical when I first saw the infomercial, but my opinion quickly changed the first time I used it in my own kitchen. 

This was the first time I made this recipe in the Copper Chef and I will never make it in any other pan! My husband even commented that this was the best I had ever made this recipe! If you aren’t familiar with the Copper Chef, I would highly recommend checking it out! Are you ready to make this delicious recipe? 

Chicken and Dumplings Ingredients:

  • 4 Chicken Breasts; Chopped
  • 32 oz. of Chicken Broth
  • 1 Can of Cream of Chicken Soup
  • 2 Cans of Pillsbury Southern Homestyle Biscuits
  • 1 Cup of Chopped Carrots
  • ½ Chopped White Onion
  • 1 Cup of Chopped Celery
  • 1 Tbls. of Onion Powder
  • 1 Tblsp. of Garlic Powder
  • Pinch of Salt
  • Pinch of Pepper

Directions For Making Chicken and Dumplings:

Pilsbury Biscuits for Chicken and Dumplings

Bake one can of the biscuits and set aside. You will enjoy these with your Chicken and Dumplings! 

Chicken and Dumplings Ingredients

Chicken and Dumplings Ingredients

Chop your onions and carrots! I LOVE our Ninja Express Chop for exactly this type of recipe. Add all of your baby carrots to the Ninja Chop and push down on the top button one or two times. It chops the carrots perfectly! Repeat this step with half of a white onion. You can add large pieces of the onion to the Ninja Chop and just press down on the button one or times and it chops them perfectly! It is also SO easy to clean, so I don’t dread the cleanup process. 

Ingredients For Chicken and Dumplings

For this recipe, I really like the celery chopped a certain way. I think it is a texture thing. So instead of using the Ninja Chop, I like to use our Clever Cutter scissors. We actually got these in a White Elephant Christmas swap one year and we love them! They seriously save so much time and you can cut them right into the soup! Oh! They can also go in the dishwasher. Let the celebrating begin! 

Chicken and Dumplings Recipe Instructions

Add all ingredients except the biscuits to your Copper Chef or pot and place the lid on top. Bring to a boil on high. If you are making yours in a Copper Chef pan, I would recommend turning the heat up to 450. I originally started with 425, but decided to turn it up to 450. 

How To Make Chicken and Dumplings

Turn the heat to a medium-low heat and cook for 45 minutes.

How To Make Dumplings

Chicken and Dumplings Recipe

Use your hands to roll 1 can of the biscuits into small balls and add them to the soup. Place the lid on to your Copper Chef or cooking pot of choice and cook on low for 30 minutes. 

Homemade Chicken and Dumplings Recipe

Serve with fresh biscuits and enjoy!

Homemade Chicken and Dumplings Dinner Recipe

My Momma’s Chicken and Dumplings Recipe
Delicious Chicken and Dumplings!
Write a review
Print
Total Time
1 hr 25 min
Total Time
1 hr 25 min
Ingredients
  1. 4 Chicken Breasts; Chopped
  2. 32 oz. of Chicken Broth
  3. 1 Can of Cream of Chicken Soup
  4. 2 Cans of Pillsbury Southern Homestyle Biscuits
  5. 1 Cup of Chopped Carrots
  6. ½ Chopped White Onion
  7. 1 Cup of Chopped Celery
  8. 1 Tbsp. of Onion Powder
  9. 1 Tbsp. of Garlic Powder
  10. Pinch of Salt
  11. Pinch of Pepper
Instructions
  1. Bake one can of the biscuits and set aside.
  2. Chop onions, carrots, and celery.
  3. Add all ingredients except the biscuits to your Copper Chef or pot and place the lid on top. Bring to a boil on high.
  4. Turn the heat down to medium and cook for 45 minutes.
  5. Roll 1 can of the biscuits into small balls and add them to the soup. Place the lid on your Copper Chef or pot and cook on low for 30 minutes.
  6. Serve with fresh biscuits and enjoy!
Notes
  1. Tip: This is especially tasty with a tall glass of sweet tea!
The Sassy Southern http://thesassysouthern.com/
SaveSave

SaveSave

Continue Reading

Wedding Gift Idea: A Year Of Firsts Wine Basket

Wedding Wine Basket - A Year Of Firsts

I love weddings! I seriously still cry every time I think about our wedding day. It was just so happy and even more than I dreamed and prayed it would be. My husband and I were blessed with the sweetest family and friends in the whole world. Not only did they give up their weekend to celebrate our wedding and marriage with us, but they gave us some of the most generous and thoughtful wedding gifts! I still have every single wedding card we received saved in a wedding memory box so that I can reminisce on the sweet wisdom and encouragement in each of those cards.

Wedding GIft Wine Basket

I have always loved shopping for wedding gifts for other people. I want to make sure I am giving them something that they will truly love! I usually stick to the wedding registry when selecting a wedding gift. However, one of my bridesmaids and her husband gave us something that was not on our registry and it was absolutely brilliant! They gave us a wine crate full of wine bottles and each wine bottle was labeled for a different “first” that we would celebrate together as husband and wife. It was absolutely beautiful. Aside from the fact that we were given a basket of WINE, each bottle had a different celebration for us to look forward to! First night married, first fight, first holiday, first dinner party, first anniversary, first baby, and first dental school graduation! The last one was very specific to us! We have joyfully celebrated with every bottle except two; first baby and first dental school graduation. Those will be enjoyed in our future!

Wedding Wine Basket

I loved this gift so much that I decided to make it for a baby shower I hosted. Now don’t freak out. This gift is for Mommy Milestones. Firsts for the mommy and daddy to celebrate with AFTER the baby is born. This was a big hit with the mommy and daddy-to-be!

Mommy Milestone Tropical Themed Baby Shower Gift

This past weekend, two of our sweet friends were married in Fredericksburg, Texas. For those who may not know, Fredericksburg is known for their beautiful vineyards. Our friends also happen to love wine, so I decided this would be the perfect opportunity to create another wine basket of firsts for the beautiful bride and groom! I found this lovely shop on Etsy called Lush Label and they create adorable custom wine labels with poems that match each of the firsts! I also used them for my Mommy Milestone Wine Basket I mentioned earlier. The shop owners are lovely to work with and their poems and labels are adorable!

Creating The Wine Basket

Wedding Gift Wine Basket

I have found that the easiest way to get the original wine labels off of the wine bottles is to put them in a bowl of room temperature water. I let them soak for about 30 minutes and then remove the label. I just use a wet paper towel and soap to pull any extra sticky stuff off of the bottle. Unless you are taking the label around the cork off, make sure the top of the bottle does not get wet! Dry the wine bottles and apply the new label. In my opinion, I think it is easiest to apply the side of the label first and then work your way to the other side. This will help prevent wrinkles! I chose a basket instead of a wine crate this time because I felt like it fit this country-wedding theme. This is also a basket that they can use in their home. I stuffed the bottom with plastic grocery bags so that my wine bottles would sit higher in the basket. I covered the plastic bags with this beautiful cream-colored sweater knit throw from Target.

Wedding Wine Basket - A Year Of Firsts

I draped the blanket over the edge of the basket and placed the wine bottles in the basket! This gift is perfect for any wine lover in your life and helps make many first memories so special!

SaveSave

SaveSave

Continue Reading

Wine Themed Bachelorette Weekend in Fredericksburg Texas

Bachelorette Weekend at Barons Creek Vineyard in Fredericksburg Texas

I may be biased, but I had the best bachelorette weekend in the history of bachelorette weekends! Over a year later and I still just swoon thinking about how amazing my bridesmaids were and still are! They planned the perfect wine themed bachelorette party and turned it into a full weekend in the beautiful Texas Hill Country!

I had a total of 9 bridesmaids. Some people are still shocked at that number, but all of these ladies are my forever friends and I could not imagine doing life without them! Some of my lovely ladies live out of state and have tiny perfect pumpkins of their own, so they were not able to attend my bachelorette weekend, but they still made sure I felt their love from far away!

Bridal Party Fort Worth Texas Wedding
My beautiful bridesmaids! Photography: The Click

I have been in my fair share of weddings and I know how expensive and time consuming they can be. Weddings are so much fun, but they are also a lot of work and money for everyone involved. I told my girls that I would be thrilled with a staycation in our lovely town of Fort Worth, Texas. I just wanted time with my girls. However, one of my bridesmaids had other plans. A few of my other girls had already volunteered to host my showers, so she said she would handle the bachelorette weekend.

She did some research and asked if I would like to go to Fredricksburg, Texas for the weekend. I told her I would love that, but I didn’t want all of my girls having to spend a fortune! She told me that she had already worked it out with the girls and as part of my wedding gift, she would pay for the house for everyone! Part of my gift?! That is like two gifts! I was so excited! A weekend getaway with your besties in beautiful Fredricksburg? Yes, please! I was so excited, I could hardly wait! Here is how my beautiful bridesmaids planned the perfect bachelorette weekend in Fredricksburg, Texas.

 Bachelorette Weekend at The Colored Door Properties in Fredericksburg Texas

The Bachelorette Weekend House

Colored Door Properties Fredericksburg Texas - The Aqua Door

Colored Door Properties The Aqua Door Fredericksburg

We started the weekend with a road trip to Fredricksburg from Fort Worth. It was so relaxing just driving through the beautiful country with your best friends. It was a great way to start the weekend. When we arrived at the house we were all blown away! We rented the Aqua Door Guest House from The Colored Door Properties in Fredricksburg, Texas

Fredericksburg Texas - Colored Door Properties

If you are not familiar with The Colored Door Properties, please get to know these lovely houses and their owners immediately! They have a total of four guest houses: The Aqua Door, The Sapphire Door, The Coral Door, and The Emerald Door. I have only stayed at the Aqua Door, but I have swooned over photos from the other houses and they are all lovely! They each sleep a large number of people making them the perfect houses for a girls’ trip! These owners have seriously thought of everything! We could not get over how perfect everything was!

The Aqua Door - The Colored Door Properties in Fredericksburg Texas
I realize this photo is blurry, but it is just too cute not to share!

Fredericksburg Texas Rental Home The Colored Door Properties

The Aqua Door is only five blocks from Main Street, the main shopping street in Fredricksburg! So clearly this is a huge plus! The bedrooms are all different themes with beautiful bedding and two of the rooms are divided by a beautiful sliding aqua barn door! The bathrooms have plenty of mirrors and counter space, so we were all able to easily get ready together. The kitchen is huge and has everything you need to cook a giant meal together.

The Colored Door Properties Rental Home in Fredericksburg Texas

Colored Door Properties - The Aqua Door

The Aqua Door Colored Door Properties Fredericksburg Texas

Bachelorette Weekend in Fredericksburg Texas - The Colored Door Properties

The Colored Door Properties Fredericksburg Texas

There is a giant chalkboard wall in the kitchen where the owners wrote a special message to us for the weekend. They also had a sound system in the kitchen to play music while you cook. We had so much fun cooking and dancing in that beautiful kitchen! The backyard is absolutely stunning! There is a fire pit with chairs, string lights, a hot tub, and a bar! They even had yard games to play. We had so much fun sitting around that campfire each night and talking late into the evening. This house was made for a bachelorette weekend!

Bachelorette Weekend in Fredericksburg Texas
This adorable swing is one of the bedrooms!

The Colored Door Properties

The Aqua Door Fredericksburg Texas Home
The backyard is stunning!

Wine Tastings and Tours

Barons Creek Vineyards - Bachellorette Weekend in Fredericksburg

My girls hired Off The Vine Wine Tours to pick us up at the Aqua Door and drive us to Barons Creek Vineyards for a private tour and tasting! Y’all. This was LOVELY! Our driver from Off The Vine Wine Tours was amazing. He came straight to our guest house and was just a call away when we were ready to leave our wine tasting. It was so nice to have a driver for the day so that all of us could just enjoy the wine tastings and not worry about driving home. 

Off The Vine Wine Tours Fredericksburg Texas

Barons Creek Vineyards is stunning! Just stunning! Their property is stunning! Did you catch that? STUNNING! There are private villas at the back of the property that you can rent and they have a beautiful space for weddings and private events. Don’t even get me started on their wine! We all left with a bottle to take home. They also have a beautiful gift shop with so many goodies! Our tour guide was absolutely lovely.

Bachelorette Weekend in Fredericksburg Texas - Barons Creek Vineyards

I would highly recommend making a reservation for your tour and tasting! They book up very quickly and you definitely don’t want to miss out on experiencing their beautiful scenery and delicious wine! 

Bachelorette Party in Fredericksburg Texas - Barons Creek Vineyards

You can enjoy their delicious selections of wine in their tasting room for $18 per person or you can schedule a private tasting and tour in one of their four rooms. These prices range from $21 to $25 per person depending on the room. Check out their website for more information on their tasting rooms and pricing. 

Barons Creek Vineyards Bachelorette Party in Fredericksburg Texas

Barons Creek Vineyards is perfect for a romantic weekend away, a girls’ weekend, or the perfect wedding venue! I highly recommend adding this to your itinerary during your next visit to Fredericksburg! Wishing you could taste their wine now? You can! Well, almost! You can order their wine online and enjoy the taste of Barons Creek Vineyards in your home! 

Barons Creek Vineyards

Shopping

Bachelorette Weekend in Fredericksburg Texas

After our morning of tours and tastings, we did a little shopping on Main Street in Fredericksburg. The shops and restaurants are all so lovely! There are so many specialty shops and antique shops going up and down Main Street. We all found something lovely to take home from our weekend away. We only made it down one side of the street before we had to go back to get ready for our dinner reservations. Don’t worry, we went back the next day to finish our weekend with a full day of shopping!

Glitter Themed Night On The Town

Glitter Themed Bachelorette Weekend in Fredericksburg Texas
Glitter themed dinner at Vaudeville!

When my girls were asking what I wanted from the weekend, I told them that I wanted a classy weekend with a glitter-themed night out. I wanted all of us to wear sequin dresses. I know this sounds silly, but I wanted to do something a little differently than the normal black and white dresses. Being the wonderful friends that they are, they did not disappoint! Everyone looked absolutely stunning! We had dinner on Main at this beutiful restaurant AND store called Vaudville.

Vaudeville Restaurant Fredericksburg Texas

Bachelorette Dinner at Vaudeville in Fredericksburg

The lower level is a delicious bistro, the second level is a showroom, and the third level is their formal restaurant. It was absolutely perfect. We had a delicious dinner and enjoyed several glasses of wine. The atmosphere was stunning and we shopped in their showroom after dinner and walked away with some lovely finds!

Wine Glass Painting

DIY Paint Your Own Wine Glasses Craft - Bachelorette Party Ideas

After our beautiful dinner, we went back to the house to paint wine glasses! My girls really stuck to this theme! It was so much fun! They even brought a giant plastic tablecloth to cover the dining room table! We listened to 90’s music, painted our wine glasses, and enjoyed some wine while talking late into the evening.

Bachelorette Weekend Fredericksburg Texas
Don’t worry! We brought a protective tablecloth for the table!

I honestly could not have asked for a better bachelorette weekend. It was peaceful, relaxing, and so much fun. We laughed until we cried, tried some delicious wine and food, and shopped all day. This was truly the perfect bachelorette weekend. So now, I must end this post with a tribute to my beautiful host! My beautiful bridesmaid and one of my very best friends made this weekend possible. She thought of absolutely everything to make this the perfect bachelorette weekend! I’m raising a glass in my virtual toast, to the classiest host. Cheers to you, Sasha! I love you! 

Colored Door Properties Fredericksburg Texas Home

Did you have the perfect bachelorette weekend? Or maybe you hosted a beautiful weekend? I would love to hear your tips and ideas. If you have a blog post, please leave me a comment below so that I can check it out!

SaveSave

SaveSaveSaveSaveSaveSaveSaveSave

SaveSave

Continue Reading

Apple Brown Sugar Monkey Bread Recipe

Apple Brown Sugar Monkey Bread Breakfast Recipe

I love having company come to town and stay with us, especially during the holidays! It reminds me of when I was younger and the whole extended family would all stay at one family member’s house! It was the best! Everyone together under one roof spending quality time together while enjoying delicious food around one big table!

Having something yummy to eat at all times is a staple for Southern Hospitality! This is something my family can do in their sleep! My Granny, my Nina, my momma, and every single one of my aunts can give Martha Stewart and Paul Dean a run for their money! I promise you I gain 5 pounds after a weekend with my family! Standing around in my jammies with a hot cup of coffee, laughing and chatting away with my family is seriously like therapy! I absolutely love it! I decided when I was younger that I wanted my home to feel that way for all of my family and friends, too!

Apple Brown Sugar Bundt Cake Recipe

I actually like doing all of the little chores to prepare the house! Things like putting fresh linens on the guest bed, having a welcome basket with bottled water and toiletries that they might need, and having a framed sign with the wifi password on their nightstand. I want to make sure they feel completely at home! While I love having a stunning breakfast to present for my guests, I don’t want to spend hours cleaning up the mess! I want it to taste delicious and look amazing on my table, but I don’t want to lose precious time with my people while I’m having to clean up the kitchen! That is why this delicious Apple Brown Sugar Monkey Bread is the perfect breakfast and brunch recipe to serve to your guests! It requires very little prep work, very little mess, and it looks and tastes like you worked for hours in the kitchen! This is definitely a recipe you will want to print for your recipe box!

Breakfast Recipe Monkey Bread

Monkey Bread Ingredients

2 Cans of Pillsbury Buttermilk Biscuits

3 Chopped Apples (Granny Smith or Red Delicious)

2 Cups of Brown Sugar

1 Cup of Granulated Sugar

1 Tsp. of Salt

1 Stick of Melted Butter

Apple Brown Sugar Monkey Bread Recipe

Directions

Set oven to 350º F and coat your Bundt pan with oil. I was out of canola oil, so I used coconut oil and it worked beautifully!

Cut each biscuit in half. Set aside.

Monkey Bread Recipe

Add the sugar, apples, and salt to a bowl and mix together. Add the butter and biscuits. Lightly toss the biscuits in the mixture until fully coated.

Apple Brown Sugar Breakfast Bundt Cake

Layer the biscuits in the Bundt pan. As you layer, use a spoon to add some of the sugar and apple mixture in-between each piece of dough. Pour any remaining sugar and apple mixture in the bowl on top of the biscuits.

Apple Brown Sugar Monkey Bread

Bake at 350 for 30 to 35 minutes. Every oven is different, so keep an eye on the biscuits to make sure they don’t overcook. Use a toothpick to make sure the biscuits are fully cooked. Let cool for 15 – 20 minutes. Place a bowl on the counter and pour the excess sugary syrup into the bowl. This will prevent the syrup from running all over your beautiful cake stand and it will be perfect to serve as a delicious caramel drizzle!

Bundt Cake Monkey Bread Recipe

Fall Bundt Cake Recipe

Place a cake stand or serving tray on top of the bundt pan. Firmly hold the bottom of the cake stand and quickly flip the bundt pan on top of the cake stand. Slowly pull the bundt pan off of the cake. Drizzle with the caramel syrup and enjoy!

Apple Brown Sugar Bundt Cake

Apple Brown Sugar Bundt Cake Recipe 

Apple Brown Sugar Monkey Bread Breakfast Recipe

Breakfast Monkey Bread Recipe

Do you have a go-to recipe that you love to whip up for company or just a lazy Saturday morning? I would love to try it out! 

Enjoy, friends!

Apple Brown Sugar Monkey Bread
A delicious monkey bread recipe for breakfast, brunch, and dessert!
Write a review
Print
Ingredients
  1. 2 Cans of Pillsbury Buttermilk Biscuits
  2. 3 Chopped Apples (Granny Smith or Red Delicious)
  3. 2 Cups of Brown Sugar
  4. 1 Cup of Granulated Sugar
  5. 1 Tsp. of Salt
  6. 1 Stick of Melted Butter
Instructions
  1. Set oven to 350º F and coat your Bundt pan with oil.
  2. Cut each biscuit in half. Set aside.
  3. Add the sugar, apples, and salt to a bowl and mix together. Add the butter and biscuits.
  4. Lightly toss the biscuits in the mixture until fully coated.
  5. Layer the biscuits in the Bundt pan.
  6. As you layer, use a spoon to add some of the mixture in-between each piece of dough.
  7. Pour any remaining sugar and apple mixture in the bowl on top of the biscuits.
  8. Bake at 350 for 30 to 35 minutes. Use a toothpick to make sure the biscuits are fully cooked.
  9. Let cool for 15 – 20 minutes.
  10. Place a bowl on the counter and pour the excess sugary syrup into the bowl.
  11. Place a cake stand or serving tray on top of the Bundt pan.
  12. Firmly hold the bottom of the cake stand and quickly flip the Bundt pan on top of the cake stand.
  13. Slowly pull the Bundt pan off of the cake. Drizzle with the caramel syrup and enjoy!
The Sassy Southern http://thesassysouthern.com/
SaveSave

SaveSave

Continue Reading

The Perfect Texas Pumpkin Patch

Sunset at Dewberry Farm Pumpkin Patch

Have you ever noticed that movies always have the best places in the world for the characters to hang out? Carnivals with the most picturesque views and delicious treats to help you have the perfect date or a fall pumpkin patch where you can pick out a pumpkin, make your way through a real corn maze, and eat a giant turkey leg while watching fireworks out in the country. I love watching these movies, but I always think to myself, where on earth do these places exist in the real world! Well, I still haven’t found that picturesque fair, but I finally found the perfect pumpkin patch!

The Perfect Pumpkin Patch

Pumpkin Patch Dewberry Farm Field

Jeremy and I love having a fall themed date weekend each year! We carve pumpkins, make caramel apples, and visit a pumpkin patch! We decided to research new pumpkin patches to visit this year and goodness did we hit the jackpot! Dewberry Farm is the greatest pumpkin patch I have ever visited! We are talking straight out of a Gilmore Girls episode in Stars Hallow amazing! Dewberry Farm is perfect for a family fun day or a date day! There is so much to do for both kids and adults!

Train at Dewberry Farm

Pumpkins at Dewberry Farm

Dewberry Farm is located in Brookshire Texas outside of Houston. They have a giant pumpkin patch full of beautiful pumpkins to purchase and hay bales all over the place to create the perfect photo setting. Behind the pumpkin patch is a giant Christmas tree farm (we are so excited to visit in December) and next to the pumpkin patch is a giant corn maze! There is a train and a hayride that will take you around the property and a wildflower garden where you can pick a beautiful bunch of wildflowers!

Christmas Tree Farm at Dewberry Farm

Dewberry Farm Pumpkin Patch


Corm Maze Dewberry Farm
We made it out of the corn maze!
Sunset at Pumpkin Patch
Sunset from the corn maze!

There is this adorable carousel sitting right by a quaint little pond with a bridge. Talk about a photo op! There are pig races (yes, pig races), pony rides, face painting, a candy cannon, jumping pillows, and so much more! During the fall, they have the Pumpkin Hollar. This is a building full of carved pumpkins! Each part of the building is a different them. It is amazing! They also have apple cannons. You load up a bucket full of apples, load them in a cannon and fire at your target! This was a BLAST, literally!

Dewberry Farm Pond

Games at Dewberry Farm

Apple Picking at Dewberry Farm

Shooting Apple Cannons at Dewberry Farm

Pumpkin Hollar at Dewberry Farm
They have the coolest pumpkin carvings and jack-o’-lanterns! 

No Tricks, Just Treats!

Food At Dewberry Farm

There are so many yummy food and drink options! Fried Oreos, fried pickles, turkey legs, hamburgers, Frito pie, ice cream, pizza… you name it! Everything is reasonably priced, so you can try several different yummies without spending a fortune! As you can see above, we didn’t hold back. When you arrive, they give you a bingo card with your wristband. There are bingo posts set up throughout the property and if you get bingo, you win a free drink! Oh! You have to try the Rooster balls. I promise they are awesome!

The Fall Fireworks Finale

Fireworks Dewberry Farm Purple

The farm is usually open until 6 PM on the weekends, but for two weekends during the fall, they are staying open until 9 PM for a fireworks show! This was truly one of the most amazing fireworks shows I have ever seen! It was absolutely stunning and made for the perfect end to a perfect date day. Talk about a romantic end to the date!

Hours and Pricing

Fields at Dewberry Farm

Admission for kids and adults is $29.95. Kids 2 and under are free. They also offer a discounted rate for seniors 55+ and all military and first responders. PARKING IS FREE! Admission includes all of the main attractions, entrance to the Pumpkin Hollar, a ride on the DewVille Express Train, your choice of Flower Picking or Apple Cannons, plus 4 activity stars to choose from for extra attractions. You can also purchase additional stars and/or tokens to participate in even more activities!

Happy Fall Dewberry Farm

If you want to take the kiddos out for a fun day, there will be plenty to do all day! They are open from 10 AM – 6 PM on Saturdays and 11 AM – 6 PM on Sundays during the fall. However, their last fireworks show for the season is THIS SATURDAY, October 21st! They will be open from 10 AM – 9 PM for fireworks. Since we were going for a date day and don’t have any kiddos yet, we decided to go later in the day. We arrived at 6 PM and had plenty of time to do everything we wanted to do! It really just depends on what you are interested in for the day. Here is their full farm map to help give you an idea of everything they have to offer.

Dewberry Farm Gift Shop

We are so excited to visit again in December to visit their Country Christmas Festival! Christmas is MY TIME, y’all! I can’t wait! Don’t worry, I will fill you in on all the Christmas goodness happening at Dewberry Farm! Do you have a favorite pumpkin patch? I would love to hear all about! Leave me a comment below so I can check it out!

Happy fall, y’all!

SaveSave

SaveSave

SaveSave

Continue Reading

Fall Date Night: Carving Pumpkins

October Pumpkin Carving

Happy fall, friends! Boy did we have a full weekend of fall fun! We went to a pumpkin patch and corn maze (full blog review on that adventure coming tomorrow), tested out a few new fall recipes, and we carved pumpkins! Carving pumpkins is super therapeutic. You get your hands super messy, cut and carve, and pat yourself on the back when you are finished creating this beautiful pumpkin! This is something the hubs and I have always enjoyed doing together. We like to make it a full date day. We go to a pumpkin patch, pick out a pumpkin, have a fall themed meal, and carve our pumpkins while watching football! For all of my Frog fans out there, TCU is 6-0 and currently ranked #4! Go Frogs! Okay, back to pumpkins.

Let’s Get Carving! 

 Target Pumpkin Carving Kits

A couple of years ago, we found these delightful pumpkin carving kits at Target. Depending on the theme, there are six different pages with designs and four carving tools. The instructions are super easy and they actually work! Oh, did I mention that these are for 9 years and up? Carving pumpkins is not easy, friends. I will take all the help I can get! These kits are perfect for a date day, but they are also very kid friendly and will be great for a family pumpkin carving session. With that said, mom and dad, you will definitely want to help. The patterns are super helpful, but it is still difficult. 

The whole concept is also really helpful to create your own patterns! Just print out what you want and use the tools and instructions in the kit to carve your design! We always have a TCU pumpkin each year, so Jeremy did a quick TCU carving. I think he did a lovely job!

TCU Pumpkin Carving

This year, I chose Disney Princesses and Jeremy chose a fun pumpkin Halloween theme. We also saw a Star Wars theme, Paw Patrol theme, and Justice League theme. They had the Avengers and Spider-Man last year, but we didn’t see them this year. Each kit is between $4 and $6! They have 6 total designs that you can continue to use with your tools! This is a steal and you can save it to use again next year! After you clean out your pumpkin, tape your design to the pumpkin and use one of the tools to punch holes along the pattern. From here, I would suggest using a marker to draw the design pattern from the holes on the pumpkin. This will help you keep track and not just see a bunch of dots on your pumpkin! I started out doing the Beauty and the Beast them, but I didn’t draw it out after I punched my holes and I totally messed it up. 

Pumpkin Carving Instructions

Final Pumpkins! 

I decided to attempt the Cinderella theme instead and that went much more smoothly! Jeremy did a very convincing bat theme and I feel that it is just very “velcoming” on our patio. 

Cinderella Pumpkin

We had so much fun carving out pumpkins and we are pretty proud of how they turned out! Which one is your favorite? If you pick Jeremy’s, I promise you won’t hurt my feelings… ha! Have you carved a pumpkin yet this year? Happy fall, y’all!

SaveSave

SaveSave

SaveSave

SaveSaveSaveSave

Continue Reading

Fall Recipes: Pear Preserves

Pear Preserves Recipe

Homemade Pear Preserves Recipe

Pear Preserves Recipe

This post may contain affiliate links. Please read my disclosure policy for more information. 

My grandma (lovingly known in our family as Nina) and my mom have been making homemade preserves since I was a little girl. Fig, pear, blackberry… you name it! Each time I spent the night at my Nina’s house, she would make her homemade biscuits and serve them with her homemade preserves. I would eat until I was stuffed! They were always so delicious! This past weekend, my husband and I spent the weekend at his parents’ house and they have a beautiful pear tree on their property. We left with a giant bag full of beautiful pears! There is no way that the two of us could possibly eat all of these before they went bad, so I decided to make a couple of jars of pear preserves! I made a smaller batch since it is just the two of us, but you can easily make are larger batch for more jars. They are delicious and make for adorable gifts! I’m super excited to share a jar with my mom and mother-in-law! This was my first try at making preserves by myself and I am pretty pleased with how they turned out! Ready to get started? Here is what you need for this tasty fall recipe: 

Ingredients

  • 1 Cup of Sugar
  • ½ Cup of Brown Sugar
  • ½ Cup of Water
  • 4 Cups of chopped or sliced pears
  • Canning Jars With Lids
  • Copper Chef
  • Giant Stockpot
  • Tongs
  • Towel

Pear Preserves Recipe

Let’s Get Cooking!

It is time to prep your jars! I will admit I struggled with this part. As I was on the phone with my mom and my Nina, I kept having them tell me how to do this part over and over! I purchased a 12 pack of Kerr Regular Mouth Jars. I was nervous doing this on my own for the first time; so I used this guide to help me with the process of preparing the jars and processing the jars once I filled them with preserves! Before you can put the preserves in your jars, you must boil the jars and the lids. I didn’t purchase any special tools or a pressurizer; I just used a deep saucepot and tongs to handle the hot jars. I boiled the jars for the recommended amount of time in the guide above and kept them in the hot water until I was ready to fill them with the preserves.

Pear Preserves Recipe Copper Chef

Add your chopped pears and water to your Copper Chef and bring to a boil. The Copper Chef made such a difference! The Cerami-Tech Non-Stick Deep Dish Pan made it so much easier to let all of the gooey goodness simmer without sticking to the pan! I highly recommend purchasing a Copper Chef ! I wanted to make sure my pears were super soft, so I had the pears boil for about 10 minutes before adding the rest of my ingredients. Just watch this closely and stir occasionally.

Add all sugar to the mixture and stir.

Leave uncovered and boil for 10 minutes. Bring heat down to a medium-low temperature and let simmer for 1 hour; stir occasionally.

Once your pears are soft and you have a thick consistency, add the pear preserves to your jars leaving about ¼ inch of space between the preserves and the lid. Your jars will be very hot! If you don’t have a cooling rack, I just used a pair of tongs to remove the jars from the pot of water and held them with a thick towel to fill them. If there are any air bubbles in the jar after you add your preserves, use a rubber spatula between the jar and the preserves to remove any air bubbles. Wipe off the edge of the jar and secure the lid on the jar. Repeat this step until all of your jars are filled.

Put your sealed jars back in the pot of hot water and make sure the water covers the jars completely. Bring the pot to a boil and boil the jars for 10 minutes. Turn off the heat and move the pot off of the burner and allow the jars to cool in the water. Once the jars have cooled, have them sit upright for about 12 hours. If your jars have properly sealed, the middle of the lid will not pop up and down. I was so nervous that I didn’t’ do this part correctly because if they don’t seal, there will be bacteria growth! The next day, I tried to lift the lid with my fingers and I couldn’t! This means I had a good seal. Again, since I didn’t have my mom or Nina with me, I was super nervous about this part, so I kept referring to this helpful guide from Ball and Kerr.

Pear Preserves Recipe

We decided to go ahead and open one of the jars the next day because they just looked so yummy! When we opened the jar, we heard the pop sound that lets you know it was properly sealed! Success! These pear preserves turned out so yummy and I was super proud that I didn’t destroy these yummy pears on my first try. They are perfect to serve with gourmet cheeses and artisan bread for a dinner party and they are delicious with biscuits and scones! I added fabric and twine to the top of two jars to give as fall gifts to our mommas! I hope you enjoy!

Pear Preserves
Yields 3
Homemade Pear Preserves
Write a review
Print
Ingredients
  1. 1 Cup of Sugar
  2. ½ Cup of Brown Sugar
  3. ½ Cup of Water
  4. 4 Cups of Chopped or Sliced Pears
Instructions
  1. Prep Your Jars (Refer to link in blog on how to do this)
  2. Add your chopped pears and water to your Copper Chef and bring to a boil. Watch closely and stir occasionally.
  3. Add sugar to the mixture and stir.
  4. Leave uncovered and boil for 10 minutes.
  5. Bring heat down to a medium- low temperature and let simmer for 1 hour; stir occasionally.
  6. Add pear preserves to the jars.
  7. If there are any air bubbles in the jar after you add your preserves, use a rubber spatula between the jar and the preserves to remove any air bubbles.
  8. Wipe off the edge of the jar and secure the lid on the jar.
  9. Repeat this step until all of your preserves are in your jars.
  10. Boil and seal the jars to seal. Refer to link in blog post for this process.
  11. Enjoy!
The Sassy Southern http://thesassysouthern.com/
SaveSave

SaveSave

Continue Reading

How To Make A Going Away Gift Basket

Gift Basket

This post may contain affiliate links, but all opinions are my own. Please read my disclosure policy for more information. 

It’s not goodbye, it’s see you later. Right? Ugh, that expression is so much easier said than done. One of my best friends moved to Illinois this summer. Her husband received an incredible job opportunity and they just couldn’t pass it up! Thankfully, the move is temporary, but it will be for a couple of years. She is a southern girl through and through and I knew she was going to feel homesick moving so far away from home. I wanted to give her things that would remind her of home and comfort her when she was feeling stressed, exhausted, and homesick. Instead of buying her one thing for her new home, which is GORGEOUS by the way, I decided to make her a going away basket full of little reminders of home. Each part of the basket went with a different letter and each letter included an encouraging scripture card that fit that occasion. I started each letter with, “Open When You are Feeling….” My hope was that each gift and letter would help her feel better during that moment. I made her a total of 6 different cards. 

Gift Basket

Open When You Miss The Sweet Sweet South

Going Away Gift Basket

There are certain things that remind us of home. For this part of the basket, I wanted her to have a taste of home when she started feeling homesick. A local jar of Texas salsa, two mini bottles of wine, and a letter full of all things Texas.

Open When You Can’t Even

Moving Gift

I knew there would be moments where she would just be over it! Sometimes, you just need to get in your jammies and chill out! This gift included one of her favorite types of candy, a romantic comedy, popcorn and wine. This letter reminded her that home is not where you live, but who you live it with and to enjoy every second of this new chapter.

Open When You Feel Stressed

Gift Basket Idea

We all experience stressful days, but being far from home with a house full of boxes definitely does not help. For this part of the basket, I included a bottle of wine, homemade essential oils bath salts, and a book to read while soaking in the bath.

Open When You Have Your First Snow Day

Gift Basket

Moving from Texas to Illinois means a major change in weather! She would finally have a real white Christmas! I wanted to make sure that she stopped and enjoyed the moment. I included a mug from Magnolia, (I have a matching one) candy canes, marshmallows and plenty of hot chocolate packets!

Open When You Need A Mollie Day

Moving Away Gift Ideas

One of our favorite things to do is to open a bottle of wine, sit on the couch in our jammies and talk late into the night. We are also really big fans of Target. It is our magical place that takes all of our worries away. For this occasion, I included a bottle of wine, a Target gift card, and a card reminding her to call me anytime, day or night.

Open When You Open and Unpack Your Last Box

Moving Away Gift Basket
Unpacking is exhausting! I wanted her to have something to look forward to and clearly there are few better ways to celebrate than by popping a bottle of champagne! I made this letter a celebratory letter to help encourage her about their fantastic new journey!

For the actual gift basket, I purchased this beautiful wicker basket from Target. I knew that this would be something she could also use in her home for décor and storage. I packaged everything together and made her promise not to open it all at once!

Have you made a going away basket before? What would your Open When cards say?

SaveSave

SaveSaveSaveSave

SaveSaveSaveSave

SaveSave

SaveSave

Continue Reading

EASY Two-Ingredient Crockpot Chicken Recipe

Crockpot Chicken Recipe

How many nights do you want to make a delicious and healthy dinner, but you just don’t have the energy? You know the scripture in Matthew, “…the spirit is willing, but the flesh is weak.”? I find myself in that position way more than I would like! That usually leads to eating out or a frozen pizza and that really doesn’t help our fitness or money-saving goals. So I started experimenting with fast, but healthy recipes that would also make for great next day lunches! This two-ingredient crockpot chicken recipe quickly became a staple on our weekly dinner menu! It is the perfect protein for so many dishes and is just so tasty! I think you will be shocked to learn just how easy it is!

Two Ingredients Crockpot Chicken

Crockpot Chicken Ingredients

  1. 4 Raw and Rinsed Chicken Breasts
  2. 1 16 oz. Jar of Pace Chunky Style Medium Salsa

Directions

Place all 4 pieces of chicken in your crockpot and cover with the salsa. Place the lid on the crockpot and select the setting for 4 hours. Go have a glass of wine, read by the pool, or head to the office while the amazing invention that we call the crockpot works its magic! After four hours, take the lid off and watch with amazement as you are able to shred the chicken with a fork!

Shredded Chicken Recipe

Crockpot Chicken Recipe

Two hours in. Looking and smelling so yummy!

Crockpot Shredded Chicken Recipe

Tada! You are done! How easy was that? This chicken is cooked to perfection and is so delicious! You can serve this in a salad, on nachos, or with a side of veggies for a low carb option! This week, I already had the ingredients for tacos, so we decided to have some shredded chicken tacos. Jeremy (my hunky husband) really likes when I serve this Chipotle style with beans, rice, and guacamole on a salad! However you decide to eat it, I can assure you that you will absolutely love it! Enjoy!

SaveSave

Continue Reading